All FAQs
Studio One
If you want to use the Warm Audio BUS-COMP to “glue” your mix together or add the character of CineMag transformers, check out the Warm Audio BUS-COMP – Checklist. This is a specialized list for fine-tuning the compression settings on your final output before you “Print” your mix.
Here’s a checklist for using the Lexicon.
There is also a hard copy of this in the Studio One handbook.
Let me know if you have additional questions.
Please see the Mic Signal checklist.
There is also a hard copy in the Studio One handbook.
Let me know if you have questions.
There are a few different ways to do this and few key steps.
Start by making a Copy of your Project so you make sure it’s saved as a package, and also so you can leave the current version on the computer you’re working on as a backup.
- Go to File > Save a Copy As
- Save as a package (not a folder)
- Name the file with “[Song Title] – for mix”
- Close the original project
From the Finder, find the [Song Title] – for mix Logic project file. This is the file you can share by AirDrop, the Network Drive (blue globe on the Dock), or Google Drive.
Advanced Level
If you want to take a look at a full professional approach to sharing a Logic project with another engineer. Check out this video:
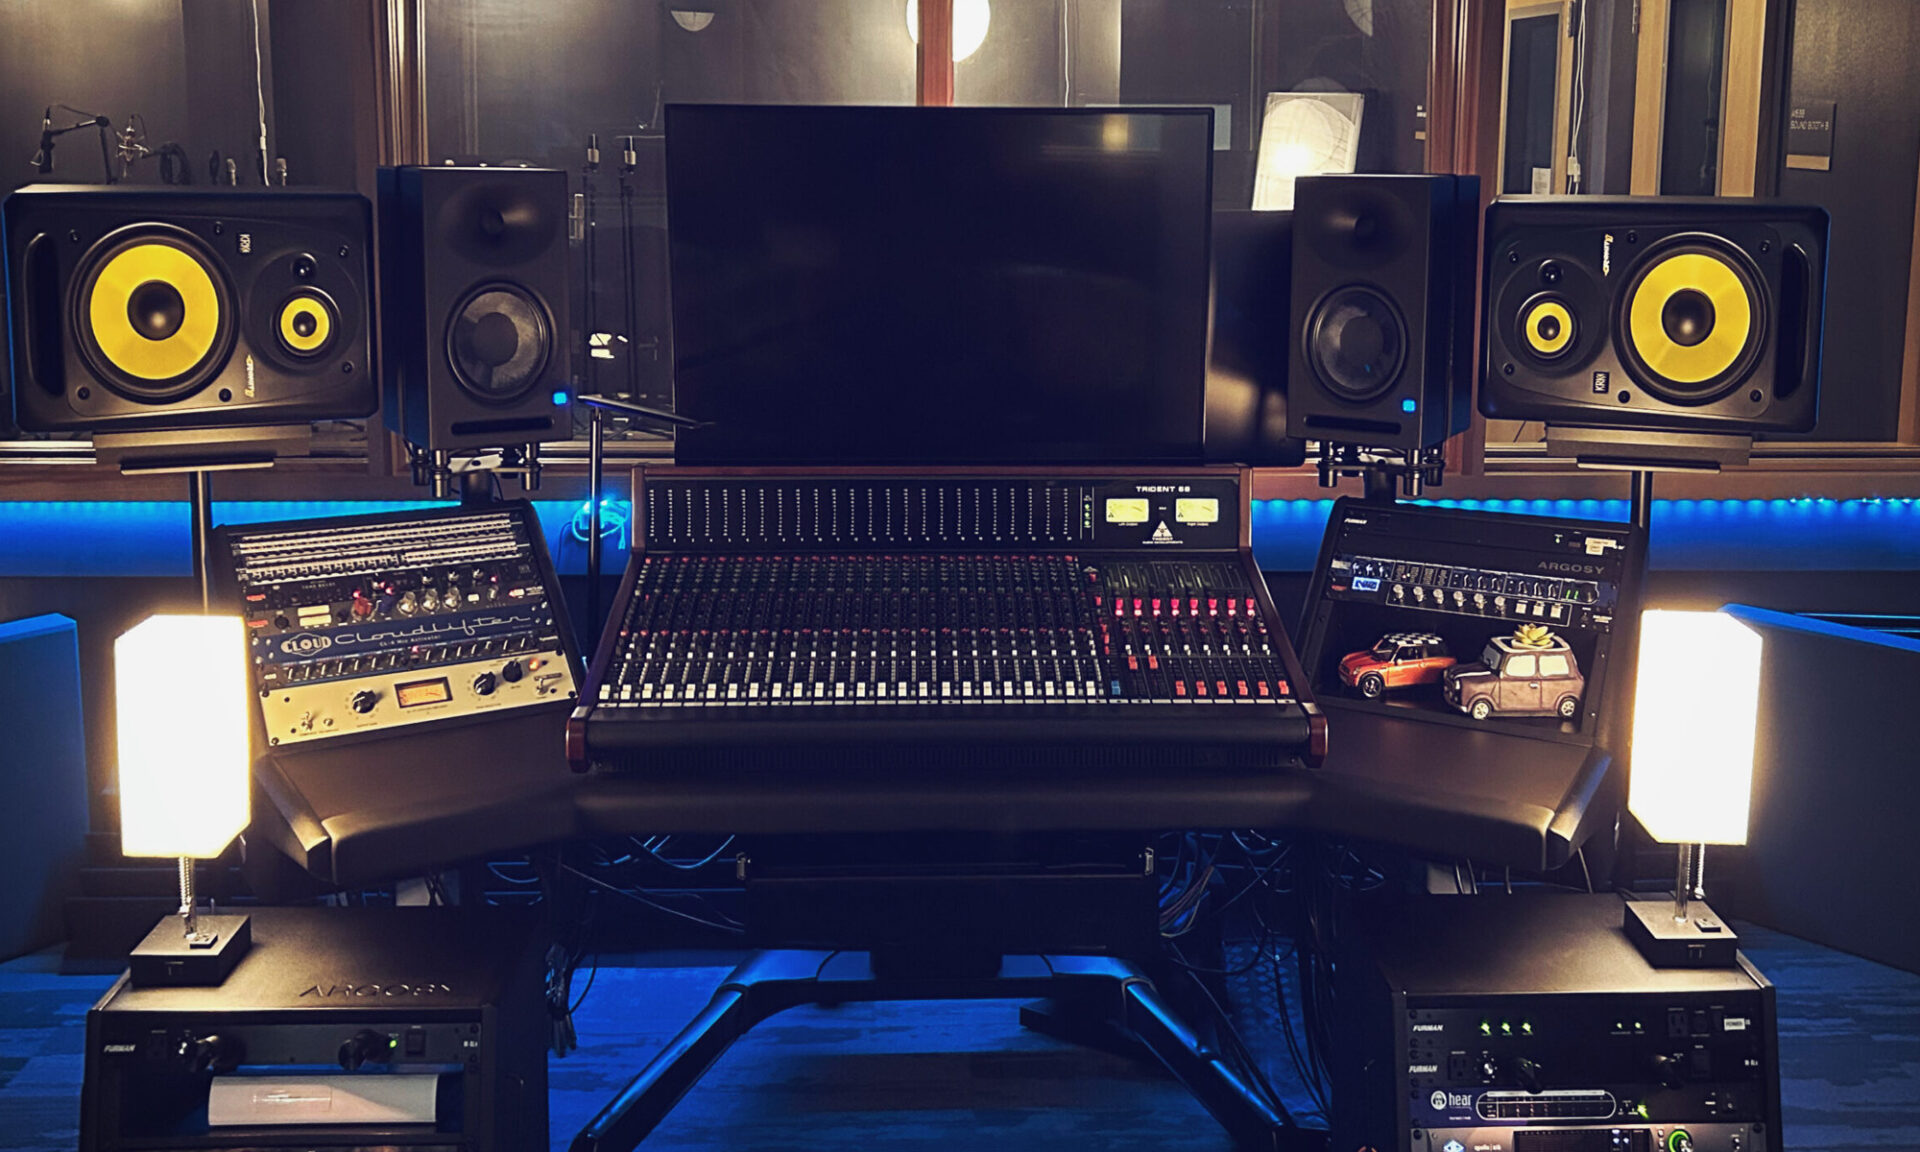
If you have finished your mix and are ready to capture the sound of the Trident 68 and the Apollo converters into a final Stereo File, you need the Mix Print Checklist. This guide covers the specific routing needed to “record” your mix back into Logic Pro while avoiding feedback loops and managing your analog headroom.
Some background info: Why do we call it “Printing” a Mix?
In the modern world of “In-the-Box” mixing, you usually just hit a button called Bounce or Export, and the computer does the work to save a final audio file. In a hybrid studio like ours, we do something called a Mix Print.
- The History: Back in the day, the final mix was played live through the console and recorded (or “printed”) onto a physical piece of 1/4-inch Master Tape. Once it was on the tape, that version of the song was “set in stone” — much like ink printed on a page.
- The Modern Version: Even though we aren’t using tape today, we are still “printing” the sound of the Trident console, the Lexicon effects, and the Warm Audio Bus-Comp back into Logic in real time.
- Why we do it: By “printing” the mix to a new track, you are capturing the unique “soul” of the analog hardware. Once it’s printed, you have a high-resolution stereo file that represents exactly what the console was doing at that moment.
If you want to use the physical outboard gear (like the Lexicon MX200) instead of software plugins, follow the Using Outboard Effects Checklist. This will walk you through using the “Aux Sends” on the console to feed signal from your instrument channel(s) into the hardware and how to properly return those effects back into your mix using the main section on the Triden 68.
I’ve got just the thing to help you out.
There is also a hard copy in the Studio One handbook.
The Studio One handbook is a white binder labeled “Control Room.” It is located on the side table (or occasionally the bookshelf) inside the control room.
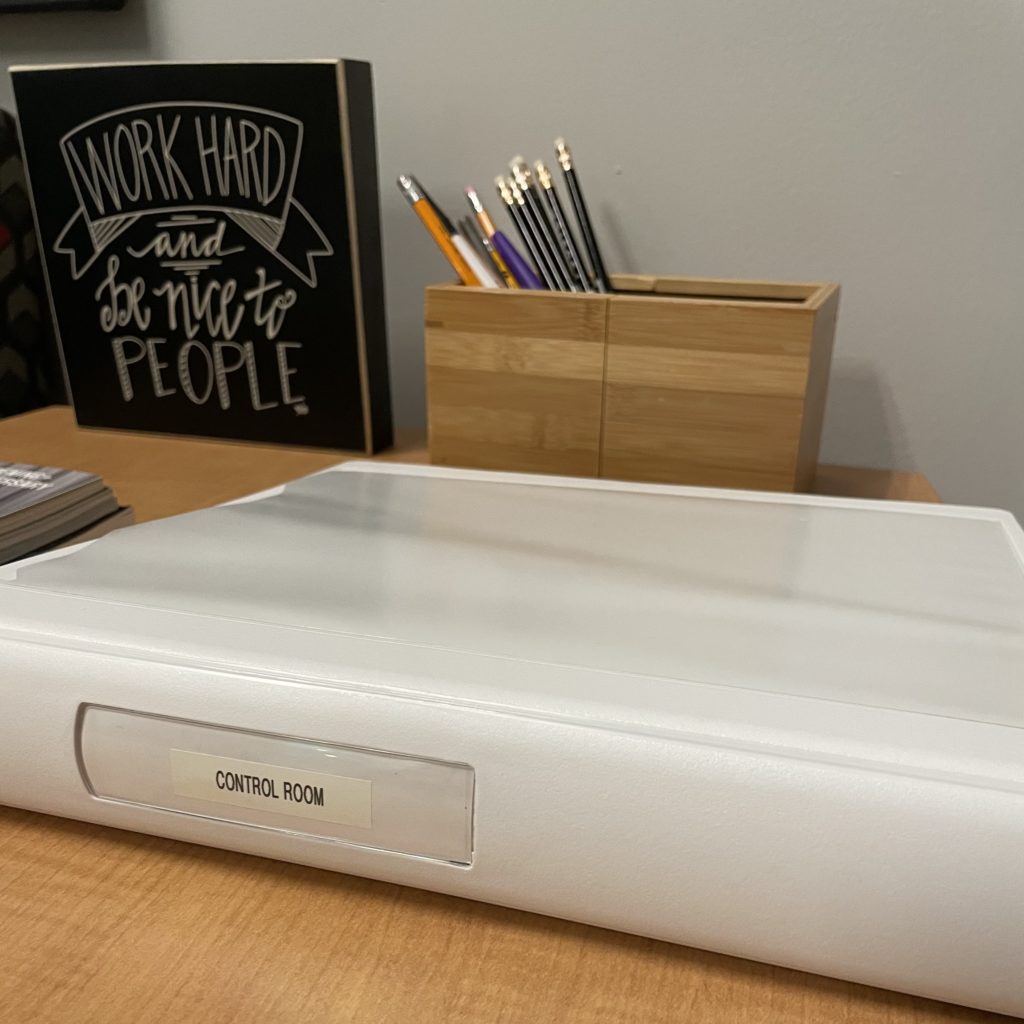
Inside this binder, you’ll find instructions for all the hardware located in Studio One.
There is also a collection of checklists that will be updated and added to occasionally. I may point you to this handbook to answer a question.
This handbook is a reference that you might find useful when setting up a particular microphone or troubleshooting a piece of gear.
If you think of something that needs to be included in the handbook, please let me know!
Mac
I’ve got just the thing to help you out.
There is also a hard copy in the Studio One handbook.
This is typically a polarity issue — in other woeds, the pedal is sending the wrong MIDI data values (e.g., 0 when pressed, 127 when released when Logic is expecting the opposite).
Here’s a good video that covers it, or if you’d prefer to read below:
How do I fix sustain pedal polarity in Logic Pro?
Use the Environment window to reverse the MIDI data:
- Open Logic Pro and press Command + 0 to open the Environment.
- Create a Transformer object.
- Route it like this: Sum → Transformer → Input Notes → Sequencer Input
- Set the Transformer to filter or remap MIDI CC 64 values (sustain) to reverse the behavior.
Here’s some additional information
Q: What MIDI message is used for sustain?
MIDI Control Change CC64 is used for sustain pedal data.
Q: Are there other fixes?
- Check your pedal or keyboard for a polarity switch.
- Try software modifiers or consult community forums for device-specific tips.
Q: Any tips to avoid this in the future?
- Test pedals in multiple apps.
- Know your controller’s MIDI implementation.
- Learn to use Logic’s Environment for advanced troubleshooting.
Projects
There are a few different ways to do this and few key steps.
Start by making a Copy of your Project so you make sure it’s saved as a package, and also so you can leave the current version on the computer you’re working on as a backup.
- Go to File > Save a Copy As
- Save as a package (not a folder)
- Name the file with “[Song Title] – for mix”
- Close the original project
From the Finder, find the [Song Title] – for mix Logic project file. This is the file you can share by AirDrop, the Network Drive (blue globe on the Dock), or Google Drive.
Advanced Level
If you want to take a look at a full professional approach to sharing a Logic project with another engineer. Check out this video:
Please be mindful of personal and equipment safety when filming off-campus.
First, make sure you let me know your filming plan so we can address any concerns before the project starts.
Then, complete the permission form. (Keep reading to see what happens next.)
Once you submit the form:
- An email will be sent to you, me, our attendance secretary, and your parent/guardian email address you entered in the form.
- After reviewing the information in the email, your parent/guardian can reply all to give their permission.
- If you would prefer a paper copy of the form, I can print that and send it with you.
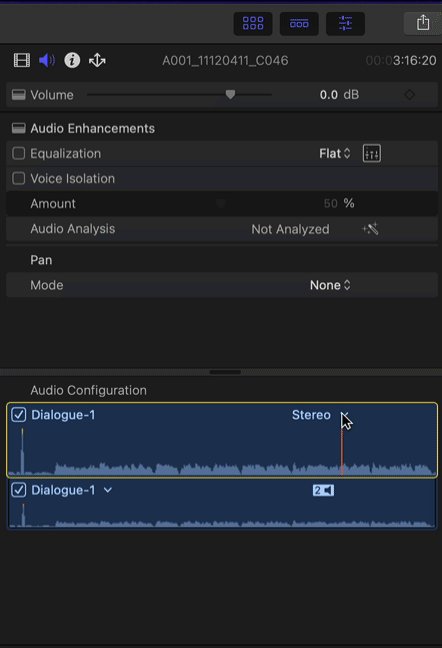
There is a chance that your headphones aren’t plugged in firmly or your system settings have the audio out of balance. More than likely though, you’re editing a project where we used a single mic to record audio into one of the two stereo channels.
This is exactly what is supposed to happen.
You correct this in Final Cut Pro’s Inspector pane (Command-4) under the audio tab (see the speaker icon up top).
Select the clip(s) you want to correct (either in the Timeline or the Browser) and change the Audio Configuration to Dual Mono. Then, disable the silent channel. See below:
Video
A real film would be mixed and “sweetened” in a different program than it was edited. A video editor would share a special file that translates the data from FCP X to Logic (or Premiere to Pro Tools, or DaVinci Resolve to Digital Performer, or any combination of A to B).
Follow these quick instructions to get started mixing your film like a pro!
Please be mindful of personal and equipment safety when filming off-campus.
First, make sure you let me know your filming plan so we can address any concerns before the project starts.
Then, complete the permission form. (Keep reading to see what happens next.)
Once you submit the form:
- An email will be sent to you, me, our attendance secretary, and your parent/guardian email address you entered in the form.
- After reviewing the information in the email, your parent/guardian can reply all to give their permission.
- If you would prefer a paper copy of the form, I can print that and send it with you.
There is a chance that your headphones aren’t plugged in firmly or your system settings have the audio out of balance. More than likely though, you’re editing a project where we used a single mic to record audio into one of the two stereo channels.
This is exactly what is supposed to happen.
You correct this in Final Cut Pro’s Inspector pane (Command-4) under the audio tab (see the speaker icon up top).
Select the clip(s) you want to correct (either in the Timeline or the Browser) and change the Audio Configuration to Dual Mono. Then, disable the silent channel. See below:
Audio
You probably haven’t lost your project, and I would guess that Logic is open, just not the main workspace. Luckily, that is an easy fix.
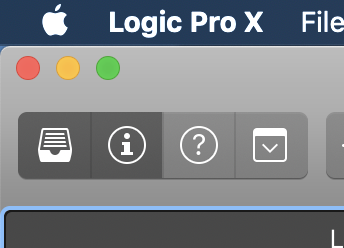
First, make sure Logic is the active application (see Fig. 1) by looking for “Logic” in the upper left-hand corner of your screen.
You have two options: (1) you can either use the keyboard shortcut Command-1

Or, (2) select Window > Open Main Window (Fig. 2) from the drop-down menu
A real film would be mixed and “sweetened” in a different program than it was edited. A video editor would share a special file that translates the data from FCP X to Logic (or Premiere to Pro Tools, or DaVinci Resolve to Digital Performer, or any combination of A to B).
Follow these quick instructions to get started mixing your film like a pro!
If you want to use the Warm Audio BUS-COMP to “glue” your mix together or add the character of CineMag transformers, check out the Warm Audio BUS-COMP – Checklist. This is a specialized list for fine-tuning the compression settings on your final output before you “Print” your mix.
Here’s a checklist for using the Lexicon.
There is also a hard copy of this in the Studio One handbook.
Let me know if you have additional questions.
Please see the Mic Signal checklist.
There is also a hard copy in the Studio One handbook.
Let me know if you have questions.
There are a few different ways to do this and few key steps.
Start by making a Copy of your Project so you make sure it’s saved as a package, and also so you can leave the current version on the computer you’re working on as a backup.
- Go to File > Save a Copy As
- Save as a package (not a folder)
- Name the file with “[Song Title] – for mix”
- Close the original project
From the Finder, find the [Song Title] – for mix Logic project file. This is the file you can share by AirDrop, the Network Drive (blue globe on the Dock), or Google Drive.
Advanced Level
If you want to take a look at a full professional approach to sharing a Logic project with another engineer. Check out this video:
If you have finished your mix and are ready to capture the sound of the Trident 68 and the Apollo converters into a final Stereo File, you need the Mix Print Checklist. This guide covers the specific routing needed to “record” your mix back into Logic Pro while avoiding feedback loops and managing your analog headroom.
Some background info: Why do we call it “Printing” a Mix?
In the modern world of “In-the-Box” mixing, you usually just hit a button called Bounce or Export, and the computer does the work to save a final audio file. In a hybrid studio like ours, we do something called a Mix Print.
- The History: Back in the day, the final mix was played live through the console and recorded (or “printed”) onto a physical piece of 1/4-inch Master Tape. Once it was on the tape, that version of the song was “set in stone” — much like ink printed on a page.
- The Modern Version: Even though we aren’t using tape today, we are still “printing” the sound of the Trident console, the Lexicon effects, and the Warm Audio Bus-Comp back into Logic in real time.
- Why we do it: By “printing” the mix to a new track, you are capturing the unique “soul” of the analog hardware. Once it’s printed, you have a high-resolution stereo file that represents exactly what the console was doing at that moment.
Follow the Level Setup Procedure Checklist.
There is also a hard copy in the Studio One handbook.
If you want to use the physical outboard gear (like the Lexicon MX200) instead of software plugins, follow the Using Outboard Effects Checklist. This will walk you through using the “Aux Sends” on the console to feed signal from your instrument channel(s) into the hardware and how to properly return those effects back into your mix using the main section on the Triden 68.
If your instruments sound out of tune or are sliding randomly, Logic is sending and/or receiving unnecessary Pitch Bend data from your MIDI controller. I used to think this was a problem attributed to our older MIDI controllers, but it seems like Logic itself might be the culprit.
Here is a fix, but it does end up disabling your Pitch Bend, so if you do need pitch bend, you’ll need to do only step 2 and then keep your fingers crossed that the fix stays.
If you don’t need pitch bend at all, you can fix this problem by filtering the input and resetting the automation.
Step 1: Filter Pitch Bend Input
If you want to stop your keyboard from sending pitch bend data entirely:
- Navigate to File > Project Settings > MIDI.
- Click on the Input Filter tab.
- Check the box for Pitch Bend.
Note: This will disable the pitch wheel on your hardware for this specific project.
Step 2: Reset the Pitch Bend Value to Zero
If your track is still out of tune after filtering the input, there is likely a “stuck” MIDI event on the timeline.
- Select the affected track.
- Press Command (⌘) + Control (^) + E to open the Automation Events Editor.
- Locate the Pitch Bend column or information.
- Set the value back to 0 to restore the track to its natural pitch.
Please be mindful of personal and equipment safety when filming off-campus.
First, make sure you let me know your filming plan so we can address any concerns before the project starts.
Then, complete the permission form. (Keep reading to see what happens next.)
Once you submit the form:
- An email will be sent to you, me, our attendance secretary, and your parent/guardian email address you entered in the form.
- After reviewing the information in the email, your parent/guardian can reply all to give their permission.
- If you would prefer a paper copy of the form, I can print that and send it with you.
There is a chance that your headphones aren’t plugged in firmly or your system settings have the audio out of balance. More than likely though, you’re editing a project where we used a single mic to record audio into one of the two stereo channels.
This is exactly what is supposed to happen.
You correct this in Final Cut Pro’s Inspector pane (Command-4) under the audio tab (see the speaker icon up top).
Select the clip(s) you want to correct (either in the Timeline or the Browser) and change the Audio Configuration to Dual Mono. Then, disable the silent channel. See below:
I’ve got just the thing to help you out.
There is also a hard copy in the Studio One handbook.
Here are some places where students have found audio samples, sound effects, and music.
Freesound – https://freesound.org
Large library of sound effects. Many files are Creative Commons; attribution is often required.
SoundBible – http://soundbible.com
Simple, downloadable sound effects. Many are public domain or CC-licensed.
FreeSFX – https://www.freesfx.co.uk
Free sound effects for educational use (account required).
Zapsplat – https://www.zapsplat.com
High-quality effects. The free tier requires attribution; paid removes it.
FindSounds – http://www.findsounds.com
Search engine that indexes sound effects across the web (check licenses).
BBC Sound Effects Archive – https://sound-effects.bbcrewind.co.uk
Excellent real-world sounds. Educational, non-commercial use only.
NASA Audio Collection – https://www.nasa.gov/connect/sounds
Public-domain audio recordings suitable for school projects.
Music / Background Tracks (Free with Clear Licensing)
Incompetech (Kevin MacLeod) – https://incompetech.com/music
Free to use with attribution.
Free Music Archive (FMA) – https://freemusicarchive.org
Curated music under Creative Commons licenses. Good filtering by license type.
Bensound – https://www.bensound.com
Free tracks with attribution.
Purple Planet Music – https://www.purple-planet.com
Free background music for educational use; attribution required.
CCMixter – https://ccmixter.org
Music specifically designed for remixing and media projects under CC licenses.
Note:
Students are responsible for checking license requirements and providing attribution when required. Not all “free” audio is copyright-free.
The Studio One handbook is a white binder labeled “Control Room.” It is located on the side table (or occasionally the bookshelf) inside the control room.
Inside this binder, you’ll find instructions for all the hardware located in Studio One.
There is also a collection of checklists that will be updated and added to occasionally. I may point you to this handbook to answer a question.
This handbook is a reference that you might find useful when setting up a particular microphone or troubleshooting a piece of gear.
If you think of something that needs to be included in the handbook, please let me know!
This is typically a polarity issue — in other woeds, the pedal is sending the wrong MIDI data values (e.g., 0 when pressed, 127 when released when Logic is expecting the opposite).
Here’s a good video that covers it, or if you’d prefer to read below:
How do I fix sustain pedal polarity in Logic Pro?
Use the Environment window to reverse the MIDI data:
- Open Logic Pro and press Command + 0 to open the Environment.
- Create a Transformer object.
- Route it like this: Sum → Transformer → Input Notes → Sequencer Input
- Set the Transformer to filter or remap MIDI CC 64 values (sustain) to reverse the behavior.
Here’s some additional information
Q: What MIDI message is used for sustain?
MIDI Control Change CC64 is used for sustain pedal data.
Q: Are there other fixes?
- Check your pedal or keyboard for a polarity switch.
- Try software modifiers or consult community forums for device-specific tips.
Q: Any tips to avoid this in the future?
- Test pedals in multiple apps.
- Know your controller’s MIDI implementation.
- Learn to use Logic’s Environment for advanced troubleshooting.